TAHub User Guide
TAHub (TAHub) is a desktop app for Teaching Assistants (TAs) to efficiently manage student-related information, optimized for use via a Command Line Interface (CLI) while still offering the benefits of a Graphical User Interface (GUI). If you can type fast, TAHub can handle your tasks faster than traditional GUI apps.
Designed to streamline the workflow of TAs, TAHub goes beyond basic contact management by including powerful features such as calculating aggregate scores, marking attendance, and tracking grades. These functionalities make it an essential tool for TAs looking to manage student records and assessments effectively. If you're new to CLI-based apps, a comprehensive Quick Start section is available to help you get up to speed quickly and confidently.
Glossary
- CLI: Command Line Interface, where you type commands to interact with the application.
- GUI: Graphical User Interface, where you interact with the application through visual elements like buttons and windows.
- Index: The position of a person in the currently displayed list. For example, in a list of 5 contacts, the command
delete 3would remove the third contact shown in that list. The value provided should be a positive integer smaller than 2147483648. - JSON: JavaScript Object Notation, a lightweight data format that is easy to read and write for humans and easy to parse and generate for machines. TAHub saves its data in a
TAHub.jsonfile, which contains structured information about contacts, grades, and attendance records.
Quick Start
Ensure you have Java
17or above installed in your Computer.Download the latest
.jarfile from here.Copy the file to the folder you want to use as the home folder for your TAHub.
Open a command terminal,
cdinto the folder you put the jar file in, and use thejava -jar TAHub.jarcommand to run the application.
A GUI similar to the one below should appear in a few seconds.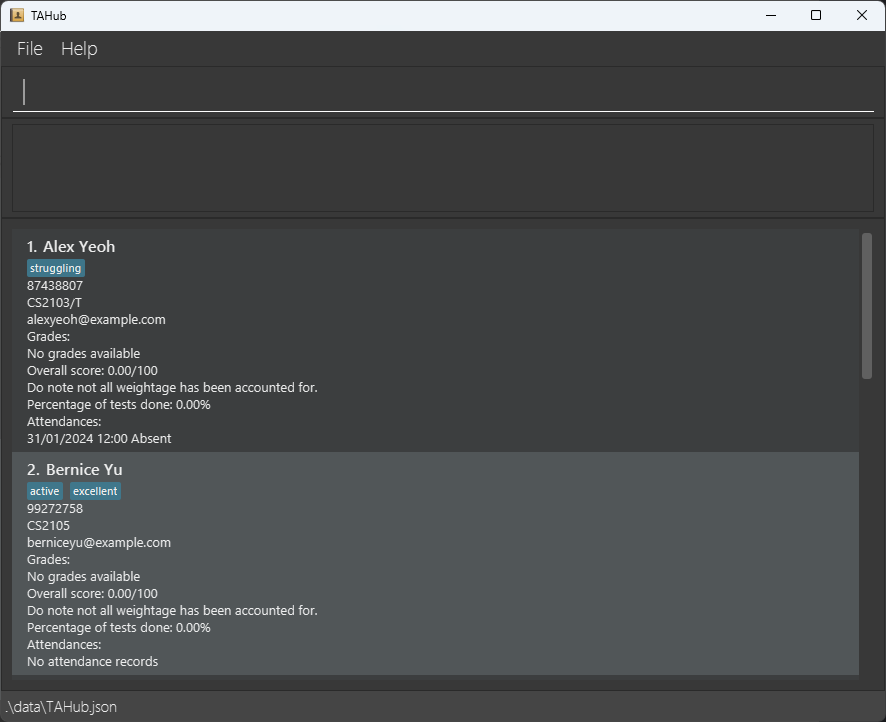
Type the command in the command box and press Enter to execute it. e.g. typing
helpand pressing Enter will open the help window.
Some example commands you can try:list
Lists all contacts.add n/John Doe p/98765432 e/johnd@example.com c/CS2103/T
Adds a contact namedJohn Doeto the TAHub.delete 3
Deletes the 3rd contact shown in the current list.clear
Deletes all contacts.exit
Exits the app.
Refer to the Features below for details of each command.
Quick Start (Detailed)
Ensure you have Java
17or above installed in your Computer.Check if Java is installed:
- Open your command terminal:
- Windows:: Press
Windows + R, typecmd, and hit Enter. - Mac: Press
Command + Space, typeTerminal, and hit Enter. - Linux: Press
Ctrl + Alt + T, or search for "Terminal" in your applications menu.
- Windows:: Press
- Once the terminal is open, type the following command and press Enter:
java -version - If your system has Java
17or above, you should see something like:java version "17.0.x" 2024-xx-xx LTS - If your Java version is lower than
17, proceed to the next step to install Java.
- Open your command terminal:
Install Java
17if not installed:- Go to Oracle's Java 17 download page.
- Download and install the appropriate Java Development Kit (JDK) for your operating system by following the instructions provided.
- After installation, repeat the
java -versioncommand to ensure Java is properly installed.
Download the latest
.jarfile from here.- Visit the GitHub releases page.
- Download the
.jarfile (TAHub.jar) from the latest release. - Save the
.jarfile to the folder where you want to store your TAHub project.
Copy the file to the folder you want to use as the home folder for your TAHub.
- Windows:
- Locate the downloaded
.jarfile in yourDownloadsfolder. - Right-click on the
.jarfile, select Copy. - Navigate to the folder where you want to store the TAHub, right-click and select Paste.
- Locate the downloaded
- Mac:
- Open the Finder and go to your
Downloadsfolder. - Right-click (or
Control + Click) on the.jarfile and choose Copy. - Go to the folder where you want to keep the file, then right-click and select Paste.
- Open the Finder and go to your
- Linux:
- Open your file manager and go to your
Downloadsdirectory. - Right-click on the
.jarfile, choose Copy. - Go to the destination folder, right-click and select Paste.
- Open your file manager and go to your
- Windows:
Open a command terminal,
cdinto the folder where you saved the.jarfile, and use the following command to run the application.- Windows:
- Open the folder where you saved the
.jarfile. - To get the full path of the folder:
- Right-click on the folder and select Properties.
- In the General tab, you will see the Location field. Copy the location path. (Alternatively, you can navigate to the folder, click on the address bar at the top, and copy the full folder path (e.g.
C:\Users\YourName\Documents\TAHub))
- Open the Command Prompt:
- Press
Windows + R, typecmd, and press Enter.
- Press
- Use the
cdcommand and paste the copied path to change to the directory where the.jarfile is located. Example:cd C:\Users\YourName\Documents\TAHub - Run the app with:
java -jar TAHub.jar
- Open the folder where you saved the
- Mac/Linux:
- Open the Terminal by searching for it or using
Ctrl + Alt + T. - To get the full path of the folder where the
.jarfile is located:- Open Finder or File Explorer.
- Navigate to the folder where you saved the
.jarfile. - Right-click on the folder and choose Get Info (Mac) or Properties (Linux) to see the full path, or press
Cmd + Option + C(Mac) to copy the path.
- Use the
cdcommand and paste the copied path to change to the directory where the.jarfile is located. Example:cd /Users/YourName/Documents/TAHub - Run the app with:
java -jar TAHub.jar
- Open the Terminal by searching for it or using
After a few seconds, the GUI similar to the one below should appear:

- Windows:
Type commands in the command box and press Enter to execute them.
Some example commands you can try:list
Lists all contacts.add n/John Doe p/98765432 e/johnd@example.com c/CS2103/T
Adds a contact namedJohn Doeto the TAHub.delete 3
Deletes the 3rd contact shown in the current list.clear
Deletes all contacts.exit
Exits the app.
Refer to the Features section below for details of each command.
Features
Below is a summary of the available commands in TAHub, with links to detailed explanations:
- Viewing help
- Adding a person
- Listing all persons
- Editing a person
- Locating persons by name
- Deleting a person
- Adding or editing a grade
- Deleting a grade from a person
- Performing grade aggregation operations
- Marking attendance
- Unmarking attendance
- Filtering people who were absent
- Clearing all entries
- Exiting the program
Refer to the specific sections for a detailed guide on how to use each command.
Notes about the command format:
Words in
UPPER_CASEare the parameters to be supplied by the user.
e.g. inadd n/NAME,NAMEis a parameter which can be used asadd n/John Doe.Items in square brackets are optional.
e.gn/NAME [t/TAG]can be used asn/John Doe t/friendor asn/John Doe.Items with
… after them can be used multiple times including zero times.
e.g.[t/TAG]…can be used as(i.e. 0 times),t/friend,t/friend t/familyetc.Parameters can be in any order.
e.g. if the command specifiesn/NAME p/PHONE_NUMBER,p/PHONE_NUMBER n/NAMEis also acceptable.Extraneous parameters are not allowed and will cause an error. Even in commands that do not need any parameters (such as
help,list,exitandclear), the program will still notify the user when unrecognized parameters are present. This is to prevent the user from making mistakes and misinterpreting what a command does.Dates supplied by the user are assumed to be in Anno Domini or the Common Era. In other words, the user will not be able to enter a date before the year 0001 AD.
If you are using a PDF version of this document, be careful when copying and pasting commands that span multiple lines as space characters surrounding line-breaks may be omitted when copied over to the application.
Viewing help: help
Shows a message explaining how to access the help page.
Format: help
Expected output:

Adding a person: add
Adds a person to the TAHub.
Format: add n/NAME p/PHONE_NUMBER e/EMAIL c/COURSE [t/TAG]…
NAME,PHONE_NUMBER, andEMAILshould correspond to a valid name, phone number, and email of the person.COURSErefers to the course this person is taking.TAGrefers to any additional information about the person and should only contain alphanumeric characters. A person can have any number of tags (including 0).- There should be no person with the same email and course after adding someone.
Tip: TAs can use tags to keep small notes about students' progress and performance in class.
Examples:
add n/John Doe p/98765432 e/johnd@example.com c/CS2103/Tadd n/Betsy Crowe t/friend e/betsycrowe@example.com c/CS1231S p/1234567 t/struggling
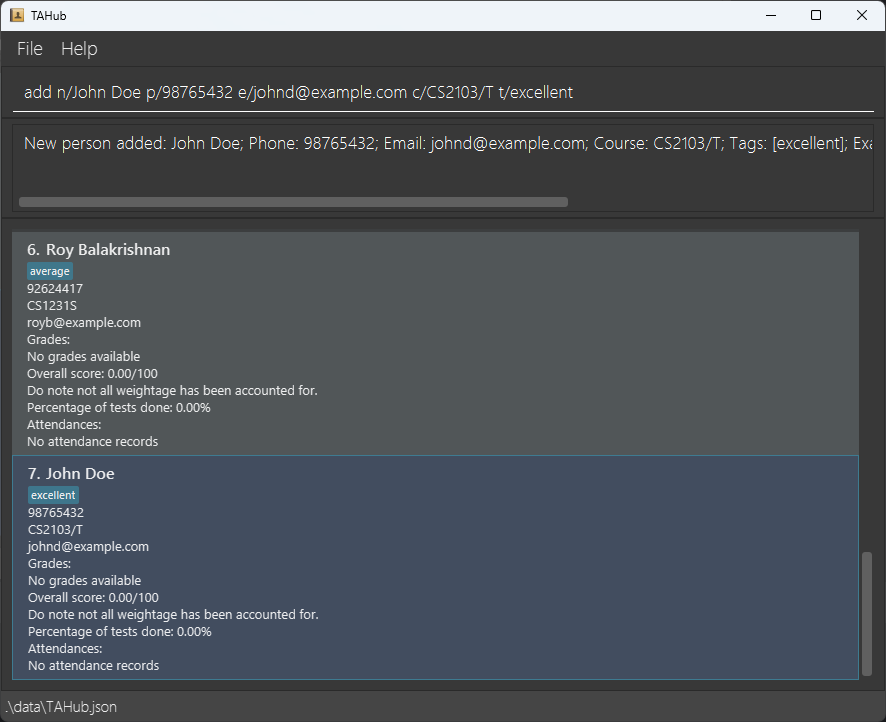
Expected output for add n/John Doe p/98765432 e/johnd@example.com c/CS2103/T t/excellent:
Listing all persons: list
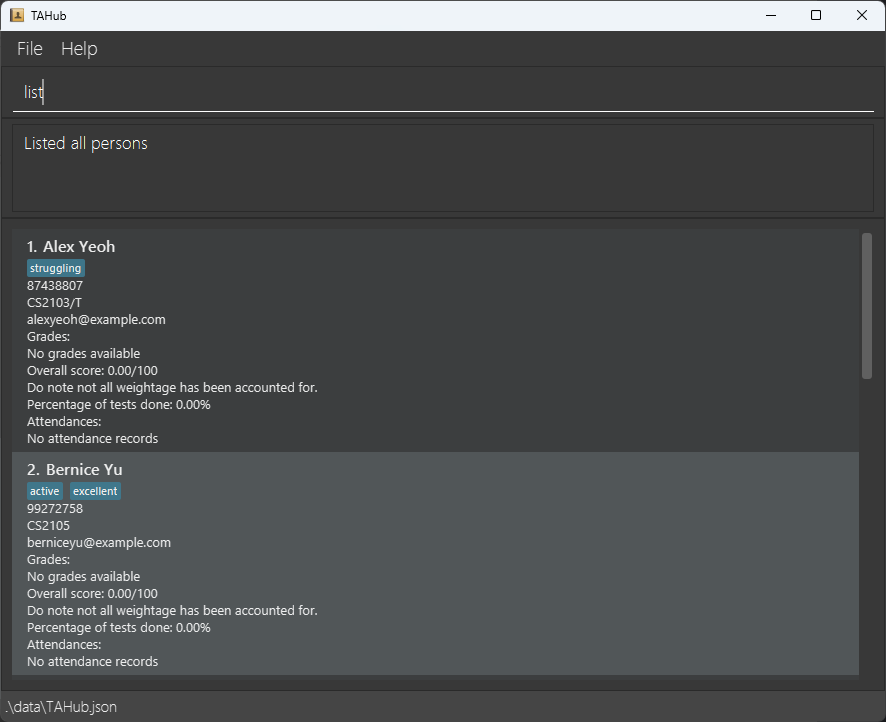
Shows a list of all persons in the TAHub.
Format: list
Expected output:
Editing a person: edit
Edits an existing person in the TAHub.
Format: edit INDEX [n/NAME] [p/PHONE] [e/EMAIL] [c/COURSE] [t/TAG]…
- Edits the person at the specified
INDEX. The index refers to the index number shown in the displayed person list. The index must be a positive integer 1, 2, 3, … - There should be no person with the same email and course after editing someone.
- At least one of the optional fields must be provided.
- Existing values will be updated to the input values.
- When editing tags, the existing tags of the person will be removed i.e adding of tags is not cumulative.
- You can remove all the person’s tags by typing
t/without specifying any tags after it.
Examples:
edit 1 p/91234567 e/johndoe@example.com
Edits the phone number and email address of the 1st person to be91234567andjohndoe@example.comrespectively.edit 2 n/Betsy Crower t/
Edits the name of the 2nd person to beBetsy Crowerand removes all tags associated with the person.
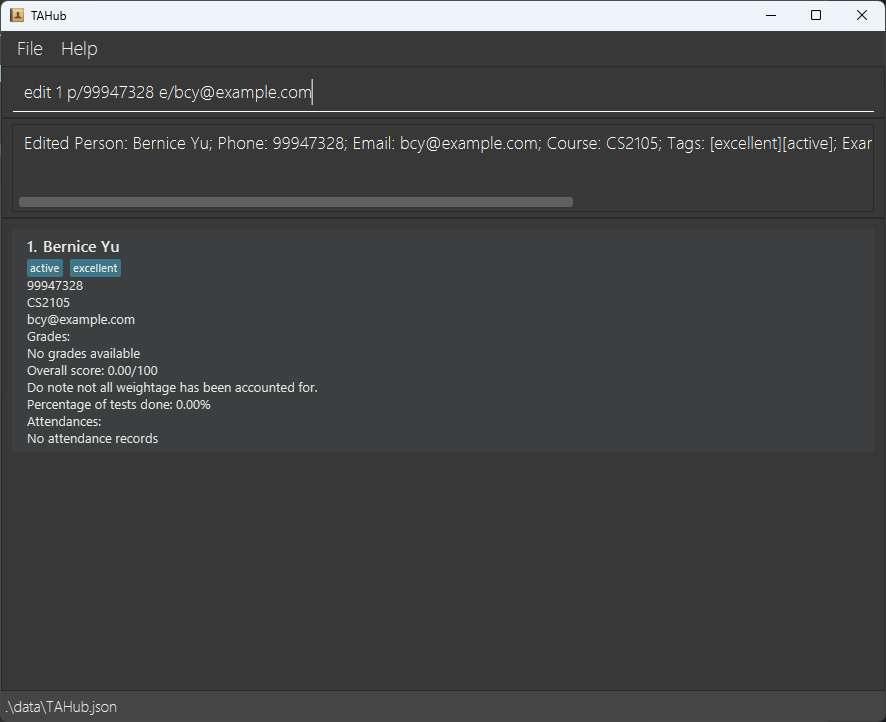
Expected output for edit 1 p/99947328 e/bcy@example.com
Locating persons by name: find
Finds persons whose names contain any of the given keywords.
Format: find KEYWORD [MORE_KEYWORDS]
- The search is case-insensitive. e.g
hanswill matchHans - The order of the keywords does not matter. e.g.
Hans Bowill matchBo Hans - Only the name is searched.
- Only full words will be matched e.g.
Hanwill not matchHans - Persons matching at least one keyword will be returned (i.e.
ORsearch). e.g.Hans Bowill returnHans Gruber,Bo Yang
Examples:
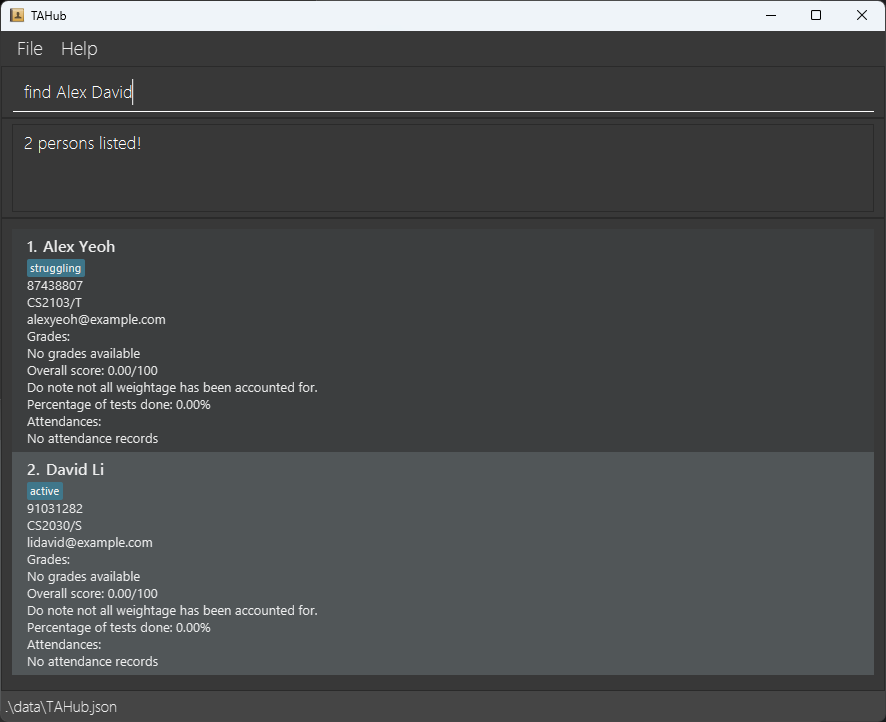
find JohnreturnsjohnandJohn Doefind Alex DavidreturnsAlex Yeoh,David Li
Expected output for find Alex David:
Deleting a person: delete
Deletes the specified person from the TAHub.
Format: delete INDEX
- Deletes the person at the specified
INDEX. - The index refers to the index number shown in the displayed person list.
- The index must be a positive integer 1, 2, 3, …
Examples:
listfollowed bydelete 2
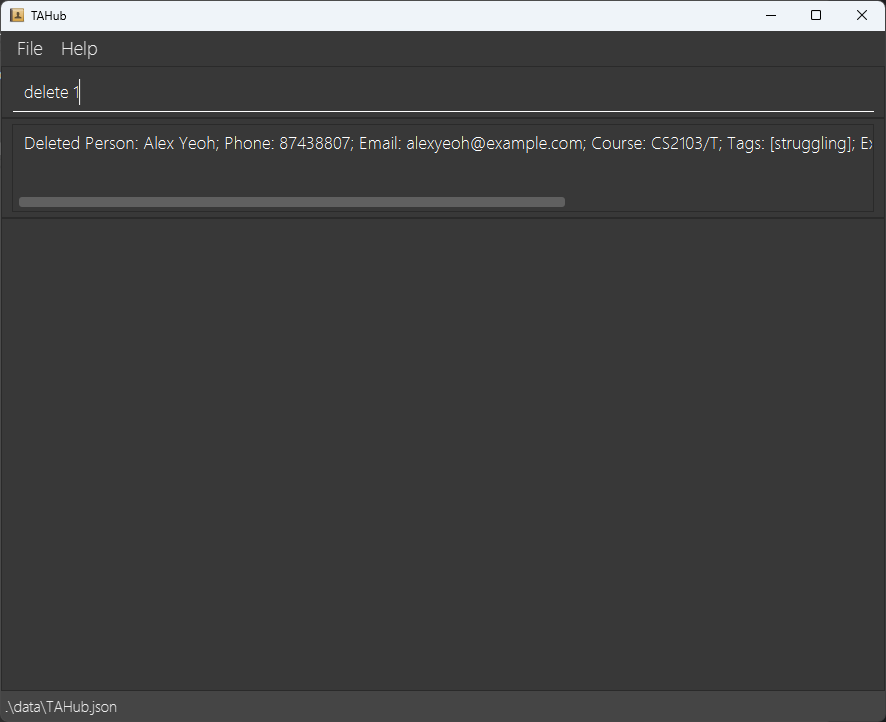
Deletes the 2nd person in the TAHub.find Alexfollowed bydelete 1
Deletes the 1st person in the results of thefindcommand.
Expected output for find Alex followed by delete 1:
Adding or editing a grade: addGrade
Adds or updates a grade for a person in the TAHub. If a grade with the same test name already exists, it will be overwritten.
Format: addGrade INDEX n/TEST_NAME s/SCORE w/WEIGHTAGE
- Adds or updates a grade for the person at the specified
INDEX. The index refers to the index number shown in the displayed person list. The index must be a positive integer 1, 2, 3, … TEST_NAMErefers to the name of the test (e.g. Midterm Exam). The test name will be automatically converted to lowercase.SCORErefers to the score obtained by the person, which must be between 0 and 100 inclusive.WEIGHTAGErefers to the weightage of the test in percentage, which must be between 0 and 100 inclusive. Weightages of 0 are allowed for tests that are formative in nature.- If a grade with the same
TEST_NAMEexists, it will be updated with the newSCOREandWEIGHTAGE.
Examples:
addGrade 2 n/Midterm s/85 w/30
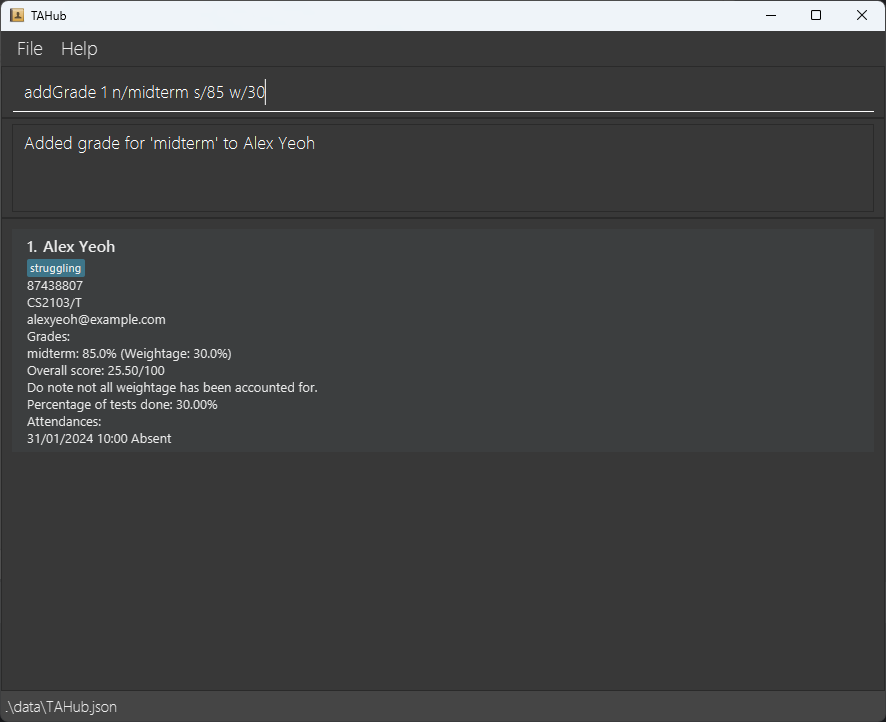
Adds or updates a grade for the 2nd person in the list with a score of 85% for a test named "Midterm" with a 30% weightage.find Alexfollowed byaddGrade 1 n/midterm s/85 w/30
Adds or updates a grade for the 1st person in the results of thefindcommand with a score of 92% for "Final Exam" and 30% weightage.
Expected output for addGrade 1 n/midterm s/85 w/30:
Deleting a grade from a person: deleteGrade
Deletes a grade for a person in the TAHub.
Format: deleteGrade INDEX n/TEST_NAME
- Deletes the grade for the specified
TEST_NAMEfor the person at the specifiedINDEX. - The index refers to the index number shown in the displayed person list. The index must be a positive integer 1, 2, 3, …
TEST_NAMErefers to the name of the test whose grade you want to delete.
Examples:
deleteGrade 2 n/Midterm
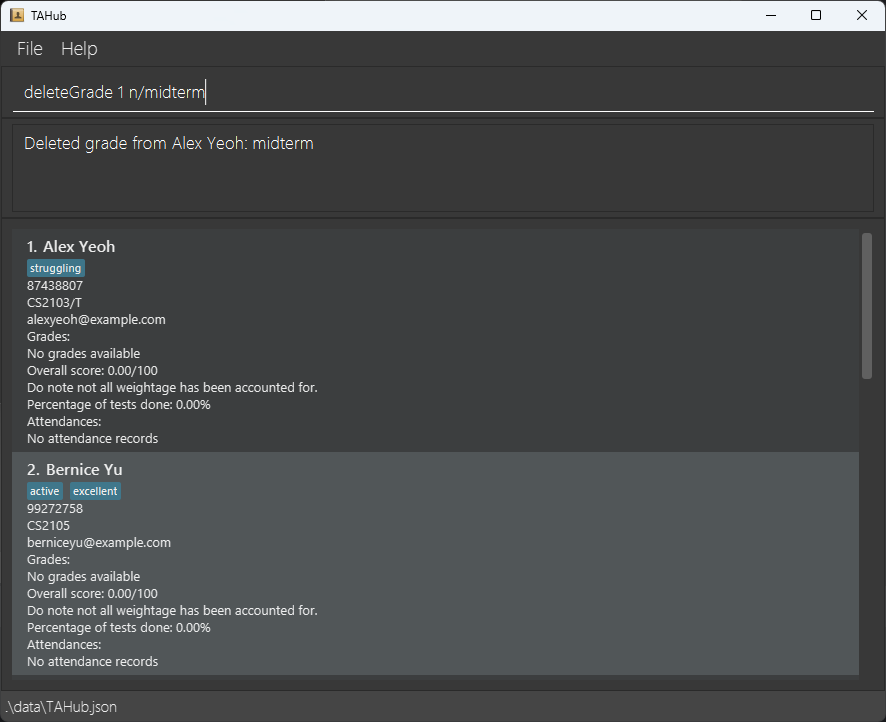
Deletes the grade for the "Midterm" test for the 2nd person in the list.find Betsyfollowed bydeleteGrade 1 n/Final Exam
Deletes the "Final Exam" grade for the 1st person in the results of thefindcommand.
Expected output for deleteGrade 1 n/midterm:
Performing grade aggregation operations: aggGrade
Performs aggregation operation on the current filtered list of people.
Format: aggGrade OPERATION [n/TEST_NAME]
OPERATION can be:
var: Taking variancestddev: Taking standard deviationmean: Taking meanmax: Taking maximummin: Taking minimummedian: Taking median
Without the [n/TEST_NAME] parameter, the command performs the selected aggregation OPERATION on the overall grade of the current filtered list.
This includes persons without any grades listed, for which the overall grade is taken as 0.00.
When adding in the [n/TEST_NAME] parameter, the behaviour of the command changes to perform the selected aggregation OPERATION only on
TEST_NAME tests of the current filtered list. This will only include persons who have the specified test recorded in their grade list.
Example:
aggGrade mean
Shows the mean of the overall grade of the current filtered list.
Expected output: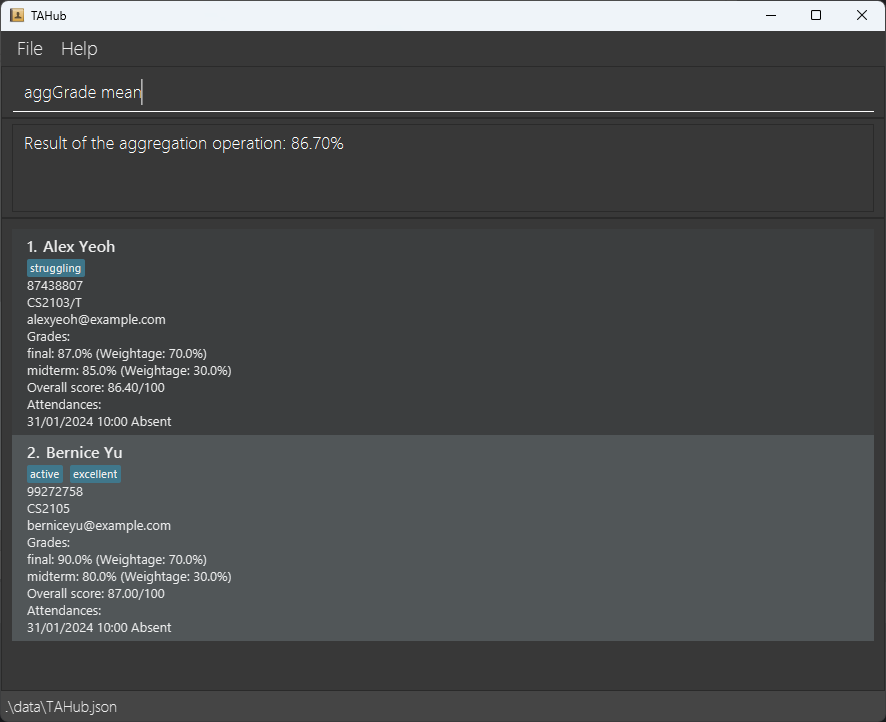
In this example,
aggGrade meancalculates the mean of the overall grades of Alex Yeoh and Bernice Yu, which are 86.40 and 87.00 respectively.
aggGrade min
Shows the minimum of the overall grade of the current filtered list (including persons with no grades).
Expected output: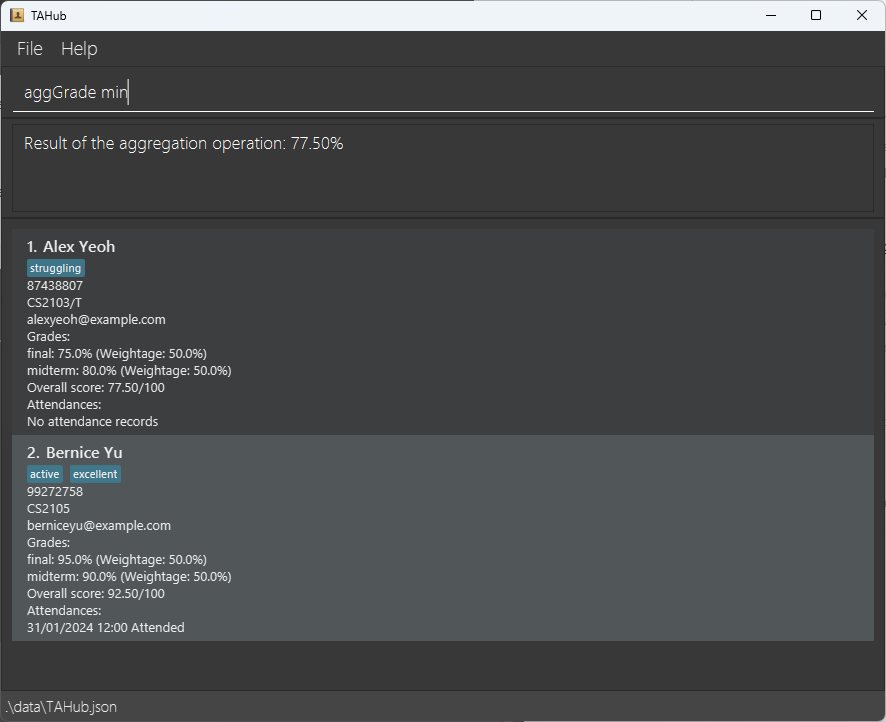
In this example,
aggGrade mincalculates the minimum of the overall grades of Alex Yeoh and Bernice Yu, which are 77.50 and 92.50 respectively.aggGrade mean n/final
Shows the mean for final tests of the current filtered list.
Expected output: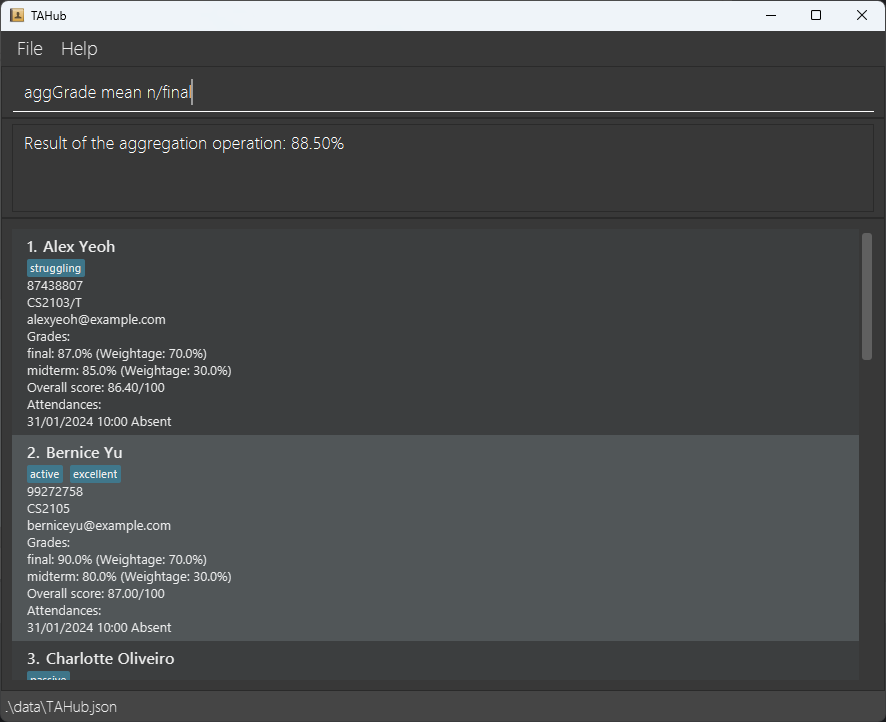
In this example,
aggGrade mean n/finalcalculates the mean of the final grades of persons who have their final tests recorded in their grade list. Only Alex Yeoh and Bernice Yu have their final marks recorded, which are 87.00 and 90.00 respectively. Other persons like Charlotte Oliveiro who currently do not have a grade for 'final' are not included in the calculation.
Marking attendance: mark
Marks the attendance record for the specified date for a person in the TAHub. If the attendance record for that date already exists, it will be overwritten.
Format: mark INDEX d/DATE_TIME m/ATTENDANCE
- Adds or updates attendance for the person at the specified
INDEX. The index refers to the index number shown in the displayed person list. The index must be a positive integer 1, 2, 3, … DATE_TIMErefers to the date and time of attendance that you want to add or edit. It must be written in the formatdd/MM/yyyy HH:mm.ATTENDANCErefers to the attendance status, which must be eitherAttendedorAbsent. They are not case-sensitive.- If the attendance record for
DATE_TIMEalready exists, it will be updated with the newATTENDANCE.
Examples:
mark 2 d/31/01/2024 10:00 m/Attended
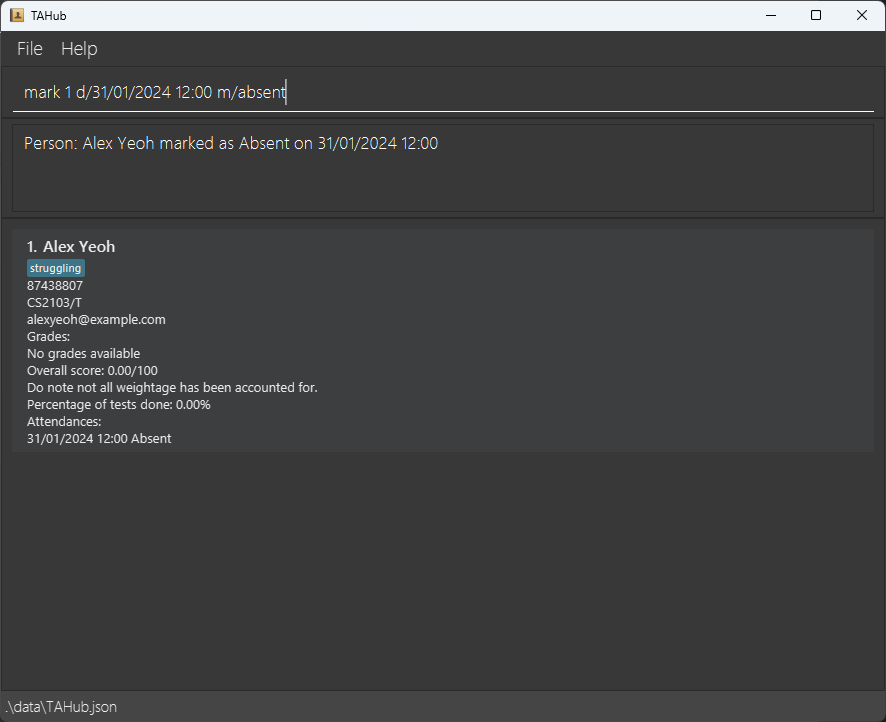
Sets the attendance to 'Attended' on the 10 AM of January 31st, 2024 for the 2nd person in the list.find Alexfollowed bymark 1 d/31/01/2024 12:00 m/Absent
Sets the attendance to 'Absent' on 12 PM of January 31st, 2024 for the 1st person in the results of thefindcommand.
Expected output for mark 1 d/31/01/2024 12:00 m/absent:
Unmarking attendance: unmark
Deletes the attendance record for the specified date for a person in the TAHub. All the remaining attendance records for that person will be retained.
Format: unmark INDEX d/DATE_TIME
- Deletes attendance for the person at the specified
INDEX. The index refers to the index number shown in the displayed person list. The index must be a positive integer 1, 2, 3, … DATE_TIMErefers to the date and time of attendance that you want to delete. It must be written in the formatdd/MM/yyyy HH:mm.
Examples:
unmark 2 d/31/01/2024 10:00
Deletes the attendance on the 10 AM of January 31st, 2024 for the 2nd person in the list.find Alexfollowed byunmark 1 d/31/01/2024 12:00
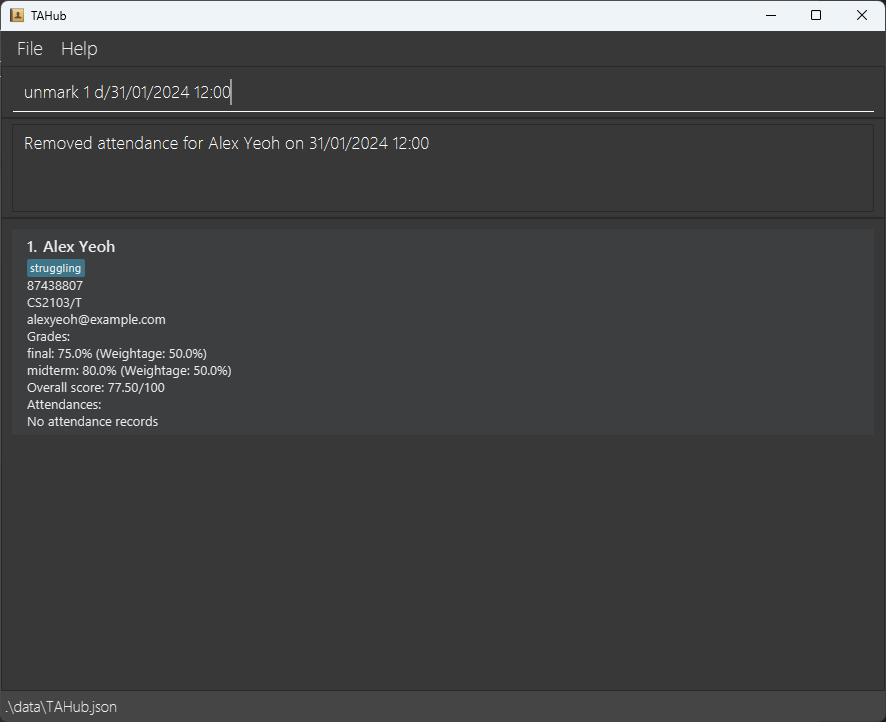
Deletes the attendance on 12 PM of January 31st, 2024 for the 1st person in the results of thefindcommand.
Expected output for unmark 1 d/31/01/2024 12:00:
Filtering people who were absent: absentees
Finds all people who were absent on the specified date and time.
Format: absentees d/DATE_TIME
DATE_TIMErefers to the date and time for which you want to find people who were absent. It must be written in the formatdd/MM/yyyy HH:mm.- Note that people who were present at the specified date and time will not be shown.
Examples:
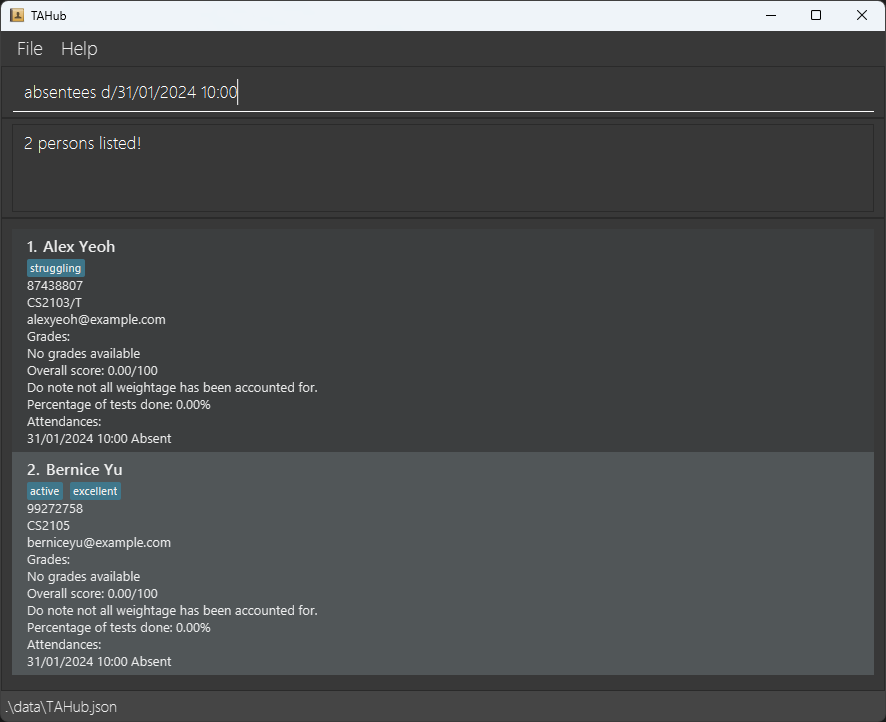
absentees d/31/01/2024 10:00
Finds all people who were absent on the 10 AM of January 31st, 2024.
Expected output for absentees d/31/01/2024 10:00:
Clearing all entries: clear
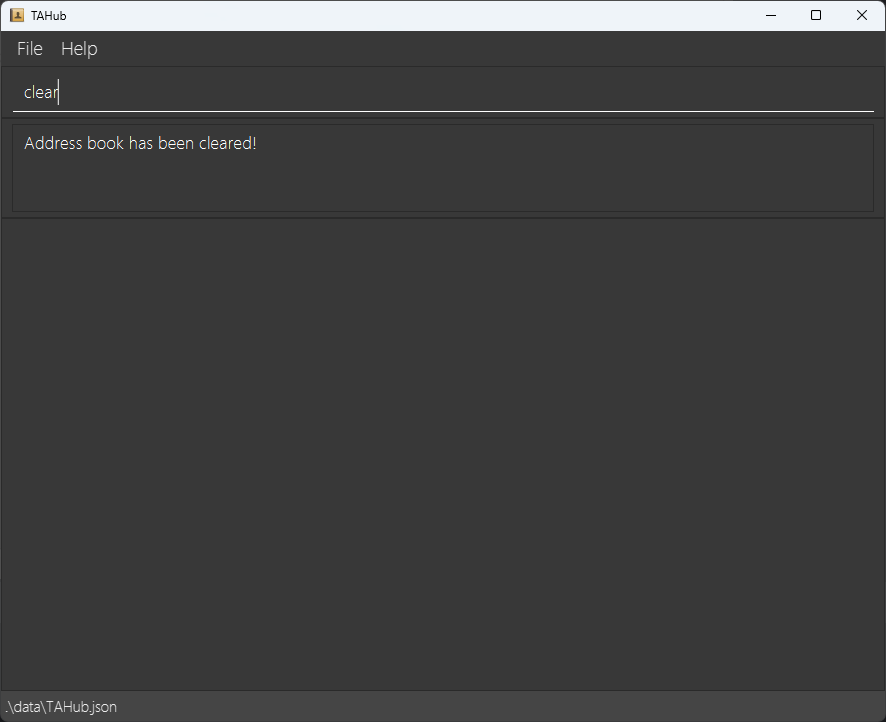
Clears all entries from the TAHub.
Format: clear
Expected output:
Exiting the program: exit
Exits the program and closes.
Format: exit
Saving the data
TAHub data are saved in the hard disk automatically after any command that changes the data. There is no need to save manually.
Editing the data file
TAHub data are saved automatically as a JSON file [JAR file location]/data/TAHub.json. Advanced users are welcome to update data directly by editing that data file.
Caution:
If your changes to the data file makes its format invalid, TAHub will discard all data and start with an empty data file at the next run. Hence, it is recommended to take a backup of the file before editing it.
Furthermore, certain edits can cause the TAHub to behave in unexpected ways (e.g. if a value entered is outside the acceptable range). Therefore, edit the data file only if you are confident that you can update it correctly.
Archiving data files [coming in v2.0]
Details coming soon ...
FAQ
Q: How do I transfer my data to another computer?
A: To transfer your TAHub data to another computer, follow these steps:
- Locate the Data File on Your Current Computer:
- Open the folder where TAHub saves its data. By default, the data file is located at
[JAR file location]/data/TAHub.json. - If you installed TAHub in a custom folder, look for the
datafolder within that location. - Copy the
TAHub.jsonfile to a USB drive, cloud storage, or any other method you prefer for transferring files between computers.
- Open the folder where TAHub saves its data. By default, the data file is located at
- Install TAHub on the New Computer:
- Download the latest
.jarfile from the TAHub releases page. - Place the
.jarfile in a folder on the new computer where you want to use TAHub.
- Download the latest
- Run TAHub Once on the New Computer:
- Open a terminal,
cdinto the folder containing the.jarfile, and run the command:java -jar TAHub.jar - This creates a new
datafolder in the same directory as the.jarfile with an emptyTAHub.jsonfile.
- Open a terminal,
- Replace the Empty Data File:
- Close the TAHub application on the new computer.
- Go to the
datafolder where the newTAHub.jsonfile was created. - Delete the empty
TAHub.jsonfile and replace it with theTAHub.jsonfile you copied from the old computer.
- Verify the Data Transfer:
- Open TAHub on the new computer by running the
.jarfile again. - Check that all your contacts, grades, and attendance records appear correctly, verifying that the data has been successfully transferred.
- Open TAHub on the new computer by running the
By following these steps, you can easily transfer all your TAHub data to a new computer without losing any information.
Known Issues
- When using multiple screens, if you move the application to a secondary screen, and later switch to using only the primary screen, the GUI will open off-screen. The remedy is to delete the
preferences.jsonfile created by the application before running the application again. - If you minimize the Help Window and then run the
helpcommand (or use theHelpmenu, or the keyboard shortcutF1) again, the original Help Window will remain minimized, and no new Help Window will appear. The remedy is to manually restore the minimized Help Window. - When using the
addoreditcommand, if the name, tag, or course has a known prefix (e.g. havingc/method e/aas the course name parameter), the application will interpret it as another parameter instead of being one whole parameter. The remedy is to avoid using any known prefixes inside parameters, or separate the letter and slash character with a space if absolutely necessary.
Command Summary
Person Commands
| Action | Format, Examples |
|---|---|
| Add | add n/NAME p/PHONE_NUMBER e/EMAIL c/COURSE [t/TAG]… e.g. add n/James Ho p/22224444 e/jamesho@example.com c/CS2103/T t/friend t/colleague |
| Clear | clear |
| Delete | delete INDEXe.g. delete 3 |
| Edit | edit INDEX [n/NAME] [p/PHONE_NUMBER] [e/EMAIL] [c/COURSE] [t/TAG]…e.g. edit 2 n/James Lee e/jameslee@example.com |
| Find | find KEYWORD [MORE_KEYWORDS]e.g. find James Jake |
Grade Commands
| Action | Format, Examples |
|---|---|
| Add/Edit Grade | addGrade INDEX n/TEST_NAME s/SCORE w/WEIGHTAGE e.g. addGrade 1 n/Midterm s/85 w/30 |
| Delete Grade | deleteGrade INDEX n/TEST_NAME e.g. deleteGrade 1 n/Midterm |
| Grade Aggregation | aggGrade OPERATION [n/TEST_NAME] e.g. aggGrade median n/Midterm |
Attendance Commands
| Action | Format, Examples |
|---|---|
| Mark Attendance | mark INDEX d/DATE_TIME m/ATTENDANCE e.g. mark 1 d/31/01/2024 10:00 m/Attended |
| Unmark Attendance | unmark INDEX d/DATE_TIME e.g. unmark 1 d/31/01/2024 10:00 |
| Filter Absentees | absentees d/DATE_TIME e.g. absentees d/31/01/2024 10:00 |
General Commands
| Action | Format |
|---|---|
| List | list |
| Help | help |
| Exit | exit |